Как работает Google. Не выкладывайте важные данные на WEB сервер
Every ASP.NET developer needs to be familiar with Page Directives. If you are a beginner and you want to learn about the Page Directives then you can read this article.
So the first question is about Page Directives.
What is a Page Directive?
Basically Page Directives are commands. These commands are used by the compiler when the page is compiled.
How to use the directives in an ASP.NET page
It is not difficult to add a directive to an ASP.NET page. It is simple to add directives to an ASP.NET page. You can write directives in the following format:
<%@%>
See the directive format, it starts with "<%@" and ends with "%>". The best way is to put the directive at the top of your page. But you can put a directive anywhere in a page. One more thing, you can put more than one attribute in a single directive.
Here is the full list of directives:
- @Page
- @Master
- @Control
- @Import
- @Implements
- @Register
- @Assembly
- @MasterType
- @Output Cache
- @PreviousPageType
- @Reference
Let"s discuss something about each directive.
When you want to specify the attributes for an ASP.NET page then you need to use @Page Directive. As you know, an ASP.NET page is a very important part of ASP.NET, so this directive is commonly used in ASP.NET.
<%@Page Language="C#" AutoEventWIreup="false" CodeFile="Default.aspx.cs" Inherits="_Default"%>
Now you have some information about @Page Directives. The @Master Directive is quite similar to the @Page Directive. The only difference is that the @master directive is for Master pages. You need to note that, while using the @Master Directive you define the template page"s property. Then any content page can inherit all the properties defined in the Master Page. But there are some properties that are only available in a Master Page.
<%@Master Language="C#" AutoEventWIreup="false" CodeFile="MasterPage1.master.cs" Inherits="MasterPage"%>
@Control
@Control builds ASP.NET user controls. When you use the directive you define the properties to be inherited by the user controls and theses values are assigned to the user controls
<%@Control Language="C#" Explicit="True" CodeFile="WebUserControl.ascx.cs" Inherits="WebUserControl" %>
As you know you need to define namespaces in your .cs class before using a C# or VB class. So the @Import Directive imports namespaces. This directive supports just a single attribute "namespace" and this attribute takes a string value that specifies the namespace to be imported. One thing you need to note is that the @Import Directive cannot contain more than one attribute/value pair. But you can use multiple lines.
<%@Import Namespace="System.Data"%>
@Implements
The @Implements Directive gets the ASP.NET pages to implement .Net framework interfaces. This directive only supports a single attribute interface.
<%@Implements Interface="System.Web.UI.IValidator"%>
@Register
When you create a user control and you drag that user control onto your page then you will see the @Register directive. This directive registers your user control on the page so that the control can be accessed by the page.
<%@ Register TagPrefix="MayTag Namespace="MyName.MyNameSpace" Assembly="MyAssembly"%>
@Assembly
The @Assembly Directive attaches assemblies to the page or an ASP.NET user control thereby all the assembly classes and interfaces are available to the class. This directive supports the two attributes Name and src. The Name attribute defines the assembly name and the src attribute defines the source of the assembly.
<%@Assembly Name="MyAssembly"%>
<%@Assembly src="MYAssembly.cs">
@MasterType
The @MasterType Directive connects a class name to the ASP.NET page for getting strongly typed references or members contained in the specified Master Page. This directive supports the two attributes Typename and virtualpath. Typename sets the name of the derived class from which to get the strongly typed or reference members and virtualpath sets the location of the page from which these are retrieved.
<%@MasterType VirtualPath="/MasterPage1.master"%>
@output cache
It controls the output caching policies of an ASP.NET page.
<%@ OutputCache Duration ="180" VaryByParam="None"%>
@Previouspagetype
This directive specifies the page from which any cross-page posting originates.
@Reference
This directive declares that another page or user control shout be complied along with the active page or control. This directive supports the single attribute virtualpath. It sets the location of the page or user control from which the active page will be referenced.
<%@Reference VirtualPayh="~/MyControl.ascx"%>
Final Words
I hope you get some knowledge from here. Please comment about how you like this article. Your comments are very valuable for me, because only you will tell me where I am going wrong and what improvements I need to make to write a better article. Please comment and provide your feedback.
Directives in AngularJS play an important role. Directives can be used to teach new tricks to HTML, and you can even create your own HTML tags or attributes. Directives also help in keeping the mark-up more fluent and defines a nice way of separating code and mark-up from each other.
View is a HTML template. View is nothing but the information you want to render to the end user’s browser. A view in AngularJS is also called as compiled DOM . View makes use of directives to render the data with HTML template.
This article is Part IV of the Project Tracking Website built in AngularJS and ASP.NET Web API. So far, we have , created a , and have .
Thanks to to review this Angular series and fix the bugs.
We have already seen the $scope object which provides a Model to the View. Model code is not intermixed with the HTML code we write into our views. Rather data is moved from the model to views by using data binding expressions. This way developers can achieve Separation of Concerns (SoC). Since Models are independent of Views, they can be bound to any View. This binding of model is done with the help of AngularJS Directives.
We have already seen some Angular directives in our like ng-app which bootstraps AngularJS, as well as ng-controller that makes the controller available to HTML. From the controller, we can bind the data to the views using Angular {{expression}}.
In this article, we will look at a couple of additional AngularJS directives which come out-of-the-box with Angular. One of them is ng-repeat . Let’s try using ng-repeat directive into our EmployeeDetails.html page that can be found in the accompanying this article. Modify the service URL in our EmployeesController.js file. The service URL is as follows:
http://localhost:2464/api/ptemployees
Now we will modify the EmployeeDetails.html page as shown in following code -
Replace the
of EmployeeDetails.html page with above code. The output of the above code is shown here:In this code, we have used the ng-repeat directive of AngularJS. It is similar to the for or foreach loop in .NET. Here we are getting an IEnumerable
Now let’s try adding a filter to search a particular Employee from the collection and display the employee based on given Employee Name or Employee Name character. Till now, we have fetched the model and used it in our Views. It also works the other way. We can make our views talk back to our models which are there in our controllers.
To add a search filter based on Employee Name, we will modify the EmployeeDetails.html page by adding HTML input elements as shown below -
Add the above code just after the
tag. In the above code, we are using ng-model directive which enables us to send the data back to the model. Based on this data, we will make a search for an employee using EmployeeName property. Make sure that EmployeeName property is declared in our model, which we will do in the following steps. Also notice that we are using ng-submit directive which will give a call to SearchEmployee function from our controller.
Now let’s modify the EmployeesController.js file so that we can search the employee based on EmployeeName property as a searching criteria. The code is shown below -
(function () { var EmployeesController = function ($scope,$http) { var employees = function (serviceResp) { $scope.Employees = serviceResp.data; }; $scope.SearchEmployees = function (EmployeeName) { $http.get("http://localhost:2464/api/ptemployees/" + EmployeeName) .then(employees, errorDetails); }; var errorDetails = function (serviceResp) { $scope.Error="Something went wrong ??"; }; $http.get("http://localhost:2464/api/ptemployees") .then(employees,errorDetails); $scope.Title = "Employee Details Page"; $scope.EmployeeName = null; }; app.controller("EmployeesController", EmployeesController); }());
In the above code, we have added the SearchEmployee() method to our $scope object as a model. This method will search for Employees based on employee name or the character of an employee name. We have also declared EmployeeName property in our controller at the end of this code. The SearchEmployees method fetches the Web API method. I have modified the method GET as shown here:
Public HttpResponseMessage Get(string name) { var employees = EmployeesRepository.SearchEmployeesByName(name); HttpResponseMessage response = Request.CreateResponse(HttpStatusCode.OK, employees); return response; }
The Employee Repository code is as shown here:
Public static List
After all these changes, now run the EmployeeDetails.html page and see the output.
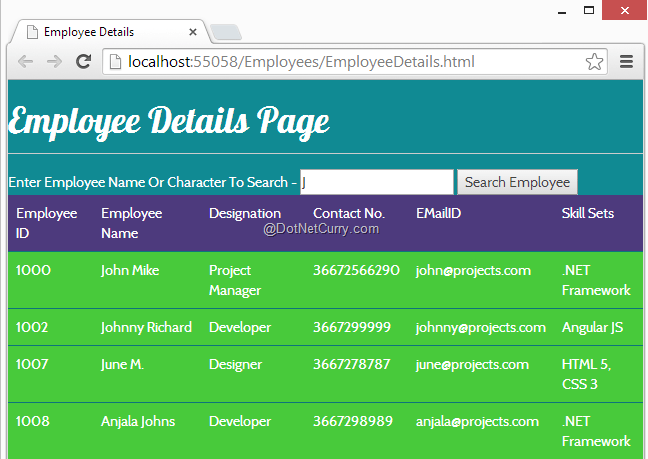
In the above output, we are searching for employees whose name contains the ‘J’ character in it.
AngularJS Filters extend the behavior of binding expressions or directives. Filters are used with binding expressions to format the data being bound. When they are used with directives, they add some additional actions to the directives. Out-of-the-box, AngularJS provides a number of filters which we can use to format the values of an expression and display the values/data into our views. You can make use of filters in Views, Controllers and Services. The syntax of using filters into views is {{ expression | filter1 | filter2 | ...}}.
We will now try a filter which will sort the data using employee name. To sort the data, let’s add a filter in our ng-repeat using a | operator as shown here:
In the above code, we are adding filter in our ng-repeat directive. The orderBy:’employeeName’ will sort the data using Employee name in an ascending order. You can observe the output here:

To display the data in descending order, you can change the filter as shown here:
In the above code, to sort the employee names in descending order, we have used (-) minus sign. Likewise, you can make use of (+) sign to sort it in ascending.
You can also make use limitTo filter to limit the number of records. For example, let us say at a time you want to display 5 employees. To display the restricted number of records in our EmployeeDetails.html page, let’s modify the ng-repeat directive as shown here-
The output is shown here:

Now if you run the ProjectDetails.html page, the date is getting displayed with time. You can apply the date filter as shown in following code -
The output of this page is as follows:

You can make use of different date formats like - fulldate, longdate, mediumdate, shortdate etc. Now let’s open EmployeeDetails.html page and run it. I am using the ‘Z’ character to display employees whose employee name contains Z.

If you observe, the output displays an Employee table heading without data. We can make the heading invisible using the ng-show directive when the filter doesn’t produce any result. Apply ng-show directive in our table tag as shown in the below code and try running the application with Z character. Now you will not see the table columns when Employees model is null. The ng-show attribute will evaluate the Employees model and accordingly it will either display the table or hide the table.
Создание и подготовка базы данных
Для организации хранения введенных пользователями данных вам понадобиться одна таблица, где можно завести поля для хранения имени пользователя, его электронного адреса, страны проживания, адреса сайта, IP-адреса, значения оценки пользователем сайта по пятибалльной шкале и т.д:
В целях удобного встраивания системы в уже существующие сайты рекомендуется спланировать еще одну таблицу, предназначенную для хранения цветовых и других установок. Это позволит в дальнейшем изменять указанные установки без изменений соответствующих параметров в исходных текстах модулей приложения гостевой книги.
- Запустите программу-конфигуратор источников данных (Data Sources ODBC) - Start->Settings->Control Panel->Administrative Tools->Data Sources ODBC.
- Перейдите во вкладку System DSN и создайте новый источник данных, нажав на Add…
- В появившемся списке драйверов выберите драйвер баз данных - Microsoft SQL Server и нажмите на Next.
- В строке Data Source Name задайте имя вашей базы данных (в описываемом примере Gustbook - это имя, по которому вы в дальнейшем будете обращаться к ней).
- В строке Server укажите сервер, к которому будет осуществлено подключение, и нажмите на Next.
- Выберите режим аутентификации With SQL Server…, задайте имя пользователя и пароль для подключения к SQL-серверу; определите протокол связи с сервером (кнопка Client Configuration - TCP/IP) и два раза нажмите на Next, после чего нажмите на Finish.
- Вы увидите статистику о проделанных действиях, а для проверки источника данных можете воспользоваться кнопкой Test Data Source.
- В итоге перед вами появится строка в списке источников данных в вашей системе.
Теперь, когда база данных готова, можно переходить непосредственно к созданию гостевой книги.
Интеграция системы в уже готовый сайт
Понятно, что сама по себе гостевая книга не имеет смысла. Посудите сами: кому нужен сайт, предназначенный исключительно для сбора мнений читателей. Ведь для того чтобы собирать мнения о чем-либо, надо сначала это что-либо представить на их суд. Следовательно, необходимо уделить особое внимание моментам, связанным с упрощением встраивания системы в уже готовые сайты.
В частности, для упрощения настройки системы под характерные особенности того или иного сайта рекомендуется (как уже говорилось выше) создать специальную таблицу для хранения всех этих предпочтений, чтобы заносить в нее определенные значения, специфические для вашего сайта. Очевидное преимущество такого подхода заключается в том, что для осуществления встраивания системы в уже готовый сайт не потребуется производить изменения в исходном коде модулей, нужно изменить только настройки в соответствующей таблице базы данных.
Представим себе пример реализации такой таблицы: .
Как видите, здесь присутствуют поля для хранения информации об имени и пароле доступа к режиму настройки системы, о цветах основного фона сообщения пользователей, верхней и нижней рамок (поля Mid_Color, Top_Color, Bot_Color соответственно), о цвете и размере заголовка формы, служащей для ввода пользователем данных (поля Form_Color и FormTitleSize соответственно), о цвете, размере и начертании шрифра текста самого сообщения, информационных полей, а также самих страниц с гостевой книгой (поля MessageFontColor, MessageFontSize, MessageFontFace, InfoFontColor, InfoFontSize, InfoFontFace, PageFontColor, PageFontSize и PageFontFace соответственно), полей-переключателей для включения режима автоматической отправки уведомлений о поступлении новых сообщений по электронной почте ответственному лицу (например, менеджеру или администратору сайта), поля хранения электронного адреса ответственного лица, текста сообщения с благодарностями за оставленное пользователем сообщение, со списком недопустимых слов и переключателем режима их фильтрации (если последний включен, то слова, находящиеся в списке недопустимых, будут автоматически заменяться в тексте сообщения на звездочки и таким образом будет осуществлен контроль за нормативностью лексики текстов сайта).
Развитие системы интеграции гостевой книги подразумевает организацию и Web-интерфейса для настройки всех рассмотренных нами параметров (полей таблицы администрирования).
Интеграция системы в уже готовый сайт в чистом виде может создавать некоторые сложности и при восприятии исходного текста, и в дальнейшем, если, например, потребуется временно отключить гостевую книгу на том или ином сайте. Поэтому попытаемся разработать систему таким образом, чтобы ее интеграция в готовый сайт не составила особого труда. Для этого необходимо сформировать независимый модуль системы и включить его в текст основного сайта там, где это необходимо. Так, к примеру, текст страницы вашего сайта может выглядеть следующим образом: