We draw household items in stages. Drawing complex subjects
As they acquire knowledge and experience when coming to drawing and drawing courses, they begin to draw objects of a more complex shape.
At the same time, it is necessary to think about the structure of the object, without which drawing acquires a mechanical, meaningless character, which means it will be useless. Drawing, for example, a simple earthenware jug, an inexperienced draftsman will try to “draw” its outer contours without thinking about the volume between them.
Such drawing is meaningless, it will not teach anything, it will not lead to anything. Only by realizing that the jug is a combination of the shapes of a sphere and a cylinder, one can easily draw it not only from nature, but also from imagination. Understanding the constructive structure of the object through the above information, bypassing, with all the complexity of the details, it can be simplified and correctly depicted in the figure in any position. 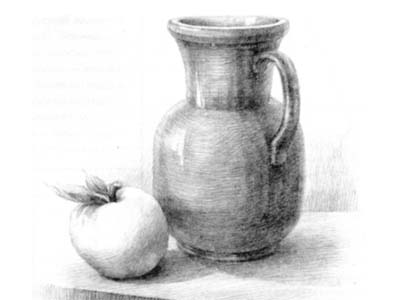
For example, in drawing and painting courses
usually drawing a stool, an inexperienced artist, not understanding the form, will begin to draw what primarily stops the attention of the legs, crossbars, seat. With this approach, confusion in details and errors in perspective construction are inevitable. Having said about the basic settings for drawing from life, we will consider several natural settings and the order in which they are performed. Of course, the issue of painting from nature is quite complicated at home, since in drawing courses you are provided with a room and nature itself, but nevertheless, for example, we have a setting in front of us: a box, on it an earthenware milk jug darkened with soot, a spoon, a piece of black bread
Still life
It is quite natural to think about the question in what order to arrange objects for drawing them. It is necessary that the still life be arranged in kind, and then its composition is found on a sheet of paper. Items should be grouped together. It is necessary to take into account the background for the still life, which should help to identify a common interesting idea. The connection of objects should not be random. Still life must be thought through in terms of content and determine in advance which learning objectives can be decided while drawing it. For educational purposes, it is useful if the objects depicted have various forms and different color tones. It is interesting to compare objects made from various materials. Take for example a few items: a jug, a spoon, bread and fish. If you put these objects at random or all next to each other, they will cover each other or leave poorly arranged pieces of paper in the drawing. Therefore, some balance must be established in the arrangement of objects and a connection uniting them into a group.
How to build balance in drawing and painting courses
What should be guided by the establishment of balance?

Still life
Let's take a look at this example. Without the image of a loaf of bread in this still life, the compositional solution would be violated: the spoon and jug would visually move the center of the composition to the right. The image of a suspended fish "justifies" the vertical arrangement of the entire picture. Our visual perception is limited to the edges of the orbital cavities; we only see what is in our field of vision. The direction of gaze determines in nature the visual center around which the selected objects must be grouped. Establishing balance in the composition is facilitated by chiaroscuro * and the spatial background depicted together with objects. When several people draw the same nature, the most successful setting is one that can be interestingly arranged for several points of view. When arranging objects for staging, one should remember about the center of the composition, which attracts most attention viewers to the main theme of the still life. For example, in a “musical” still life it is a violin, in a “school” it is a globe. The remaining items are arranged depending on their purpose (the bow is closer to the violin, the bucket is closer to the fish and the basin), and also depending on the significance they have in the composition, directing attention to the main subject, balancing individual parts of the still life or emphasizing the spatial depth staging.
The main subject should not be brought to the fore, it should be moved a little in depth, trying not to block small objects.
It should be noted that the intended composition of a still life, being located in length or height, requires different formats paper. The location of the parts of the artistic whole is connected with the format of the sheet, with its right angles, diagonals, center, etc. Having quickly looked at nature, we see everything at once at once: shape, proportions, light, color, material; therefore wholeness visual perception is a prerequisite for a true image. But since it is physically impossible to draw all objects at once, and drawing in parts will inevitably lead to fragmentation and variegation, it is necessary, first of all, to consider nature in a generalized way. Therefore, the process of drawing, as already noted, begins with a generalization of the form. The first task is to place the drawing on paper. With a light touch of the pencil, we determine the space occupied by the image on the sheet. To do this, it is necessary to outline the height and width of the entire group of objects, as well as to find the ratio of the sizes of the objects to each other and to the entire picture. Sometimes, as a check on the correctness of their observations, painters use the so-called sighting method, that is, measuring the ratios of the sizes of objects with a pencil, which they look at with one eye, holding it in front of nature at arm's length. This method can only be used to check the ratios found visually, for self-control, and it must be gradually abandoned with the development of the eye. When drawing a production of several objects, you should not draw and finish them separately. Comparing objects with each other, you can determine their size and establish the relationship between them, which depends on their common lighting and environment. It is necessary to correctly determine the light and shade ratios, contrast, etc. In the process of work, we more definitely set the boundaries of the form based on its internal structure. Having outlined shadow surfaces with light strokes, we thereby reveal the volume of objects. After that, it is much easier to clarify the proportions: but even for this, while drawing, one should cover the entire production as a whole with the eye, trying to depict objects not separately, but in connection with each other. Also, in the elaboration of details, it is not recommended to run ahead and focus all attention on individual parts.
It is necessary to try until the end of the work to maintain the freshness of the surface of the sheet of paper on which you draw. To do this, you need to start the drawing with light touches of the pencil, increasing its pressure gradually in the process of work. Premature sharp lines with their blackness and roughness make it difficult to see mistakes, make corrections difficult, and require the intervention of an elastic band. Eraser destroys the surface of the paper and, contaminating it, makes the drawing difficult to correct. Next, proceed to a more decisive identification large forms with the help of light and shadow, bringing them to necessary strength. The transfer of light and shade is better to start with the shadow parts, then determine the lighter places. Light and shadow have shades depending on the lighting conditions. After that, we lay halftones connecting the shadow with the light, which has great importance in conveying the nature of the form. On polished rounded objects, we mark and convey glare and light reflections in the drawing. If at first we talked about drawing plaster models by means of chiaroscuro, then the introduction of a variety of objects with different textures and colors into the staging does not allow working with chiaroscuro alone, especially with diffused lighting.
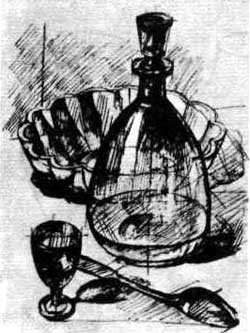
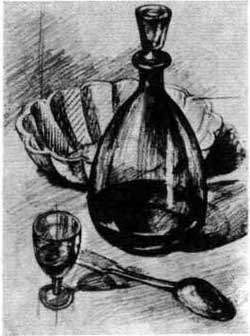
Each color has its own luminosity, this should be taken into account by the painter. For example, under the same lighting, blue will appear light, and blue will appear dark; blue is darker than yellow, etc. Therefore, using various shades light and dark, you can give a different tonal characteristic of the depicted objects. Naturally, the color corrects the light-and-shadow relations, either strengthening or weakening their intensity. A shadow on a white plaster ornament may appear lighter than an illuminated piece of black velvet. In the disassembled drawing of a still life, the image of a brown clay jug covered with soot requires a darker tone. The corner of the box, which is in the foreground, is sharply emphasized; the edges of the bread and jug located farther from the viewer are softened, since at a greater distance all contrasts soften. Advice about drawing courses. You may be asked to draw objects in drawing courses, subsequently mastering the first tasks in the image individual items, in the future they should not be drawn isolated from environment. The background, depicted simultaneously with objects, creates the impression of a real space. A wall or a drapery stretched without folds can serve as such a background. Its even tone should be slightly darker than the illuminated parts of the subject and lighter than it).
If you did go to drawing and painting courses, in the process of drawing you can observe the operation of the law of light contrast, due to which the background will be noticeably lightened at the shadow edge, and next to the light edge it will appear much darker. You will observe this effect yourself in painting courses, because no one will tell you personally. Groups are usually large and the purpose of the above is to teach you the basics of drawing so that you understand the process itself, and you can always ask questions to the teacher of drawing courses.
In this lesson, we draw a simple still life with a pencil from household items..
You can take ordinary, everyday things as a basis at the very beginning, it is important that they are not complicated in detail. It is better to take plain, simple things without decor. Gradually, you can complicate the task by adding more complex ones. It is important to learn the steps in this lesson. If we draw a still life with a pencil, then you should pay attention to subject relationships and their influence on each other, the impact of the surrounding space will also be noticeable, especially on glass, metal, and other household items with a reflective and mirror surface. Three or four will be enough to start.
First, draw a still life with a pencil, with a simple decor and flowers. In the process of drawing, you should correctly place the elements of the landscape in the plane of the sheet. Create an expressive composition, try different angles, move individual models to create a more or less interesting setting.
It is recommended that the stages of the image on the plane be carried out immediately over the entire plane, working on all elements at the same time. We draw a still life initially with thin lines and a light stroke. Gradually, using the stroke seal method, we achieve the saturation of the tone of the entire pattern. After building the image, you should once again check the correct placement of elements in space. And the right balance of proportions and shapes. Chiaroscuro gradations also have their own laws, maximum brightness and saturation, as a rule, in the area closest to the light source. Checking the entire drawing for realism is carried out at the end, here the nuances are clarified. For example, if there are a lot of highlights on the elements, then the brightest one will again be the one that is closer to the light source. Likewise with shadows in a drawing, the saturation of the tone decreases as you move away from the light.
First stage.
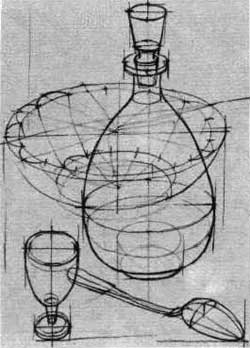 Placement on the plane of the sheet of the entire composition. Try multiple points of view by painting a still life from different angles and with different points vision. We draw a still life with a pencil with light strokes, outlining the overall composition with very light lines. Let's outline the faces of the details and the vertices.
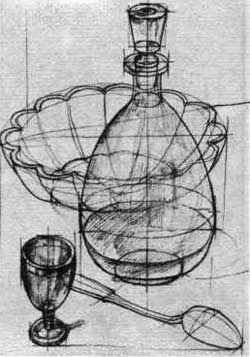
Second phase.
Construction of elements and forms of still life on a plane. We build separately each and place. We check the ratio of sizes, rebuild perspective cuts. We check using generalized forms that are basic for objects. We draw with a pencil with a very light stroke, refining the lines, making them somewhat thicker and denser. At the end, there should be an image on the sheet that conveys a common clear picture of all models.
Third stage.
Let's check the proportions again. We draw in a still life with a pencil easily and at the end we outline the general gradation of chiaroscuro for each of the forms. For round objects, draw the boundaries of the main tonal transitions. We outline the position of the shadows falling and our own. All models must have a readable form, properly built.
 Fourth stage.
The most interesting. Here we draw the whole still life with a pencil. Starting with the shadows, we hatch and create the correct tonal alignment. We create tonal transitions for spherical objects. Gradually, after passing through the strokes of dark places, we compact the light ones. Constantly compare with nature. At the end, we have a finished drawing with correctly transmitted light and shade ratios.
Fifth stage.
We bring the work to the final finished version. We check the saturation in the tones of the pencil stroke for the correct transmission of the entire space. Remember that there is only one place in the picture, the brightest and one darkest. We draw glare in a still life. All highlights with light strokes on mirror surfaces you can go through with a light stroke, leaving only the one closest to the light without hatching. For purity and brightness of highlights, it is recommended to first clean them with an elastic band.
During the period of studying the drawing of everyday objects, try to put on more interesting performances, it will be easier and more pleasant to conduct classes.
If we draw a still life with a pencil with planes of different colors, try to correctly convey the tone of the paint in the drawing. Next, we draw still lifes with a pencil, consisting of more complex forms, transferring the texture.
simple bodies.
Ball.
The picture of the castle is good lesson for learning to draw buildings and houses. With an ordinary simple pencil, you will gradually learn how to draw the proportions of a building, create a perspective for the landscape surrounding the castle, learn how to add volume to the walls and towers of the castle with the help of shadows and lines.
A house is an architectural structure, so when drawing it in stages, you first need to build a drawing of the house, and only then start adding details of the picture of the house. When drawing a building, you cannot do without a ruler, and of course a pencil. The house should look symmetrical, so you need to accurately measure the height, width, etc. using a ruler.
It would seem so easy to draw such an object as an asterisk, but try exactly, correct form draw it without reading this lesson. You are unlikely to succeed. Before drawing a five-pointed star, you need to draw a circle on paper with a compass and then divide it into equal parts.
Maps of the area have been known since ancient times, but for us they are primarily the subject of pirate times, sailboats with skulls on the flag, treasures hidden on the islands, which can only be found on the map.
To draw a picture of a snowflake, in addition to a pencil, you need a ruler. Any drawing of a snowflake has the correct geometric shape and therefore it is better to draw with a ruler. Are there any snowflake patterns? No, of course, each snowflake is unique and has one single crystal form.
The lesson, "How to draw a vase" with flowers in pencil, is passed by all students of the art school, who study how to draw the objects around us. The vase is classic educational material to study the technique of creating volume for objects.
Nowadays, graffiti is very popular among young people, but not everyone can draw graffiti in a beautiful and stylish way. Let's try to learn how to draw graffiti on paper with a pencil, then coloring the resulting inscription with paints or colored felt-tip pens.
All children love to make snowmen in winter. Now try to draw a snowman, fixing your impressions on a piece of paper.
Drawing nature, especially in summer and autumn, is very exciting. Drawings of autumn nature are, first of all, a unique palette of colors of tree leaves. Ordinary leaves turn surrounding nature into a fairy tale.
To learn how to draw various objects, animals, you first need to try to draw simple objects, such as a mug, glass or glass.
Constantly and daily it is necessary to draw not only in the classroom with specially prepared models, but also at home, depicting household items, culture, labor.
The principles and techniques of drawing can be successfully mastered on such items as furniture, dishes, kitchenware, since in most cases they all have a geometric basis of construction and, at the same time, are diverse in shape and plasticity. Fine examples are found among household items folk art or samples of decorative and applied art of one style or another, in the creation of which artists or architects sometimes took part.
The artistic expressiveness of these objects is based on the unity of material and design, texture and color. You need to start drawing with more simple items, which are based on one geometric shape, and then move on to more complex forms consisting of combinations of several geometric shapes. Household items are very diverse in shape, texture and color. At the beginning of educational drawing, the main attention should be paid to the constructive construction of the form, without being carried away at first by the overly picturesque side of texture and color. Household items for drawing should first be chosen in a simpler shape - close to a cube or parallelepiped, for example, a box, a box, a box, and the like (Fig. 1, 2). How to draw like appearance object, and internal, pushing the middle part matchbox or opening the lid of the box and certainly in various turns. Then you can move on to drawing objects that include cylindrical and conical shapes - mugs, cans, buckets (Fig. 3, 4), again studying the features of their construction from all points of view.
Fig 1. Drawings of boxes and boxes
Having mastered the construction of simple objects, you can take for drawing more complex ones, the surfaces of which are formed by curved lines, for example, a lid, a jug, a teapot, a vase, musical instruments, and later objects whose surfaces are decorated with ornaments. In the end, you should work on a still life, composed of thoughtfully selected in shape, color and semantic meaning, as well as household items that fit well with each other (Fig. 5). These exercises will help develop a sense of the relative relationships of one object to another, the ability to subordinate the perspective construction of a number of objects from one point of view and convey the same conditions for their illumination. Working on a still life of household items raises questions about the influence of color and texture on light and shade relationships and on the perception of the size of the form.
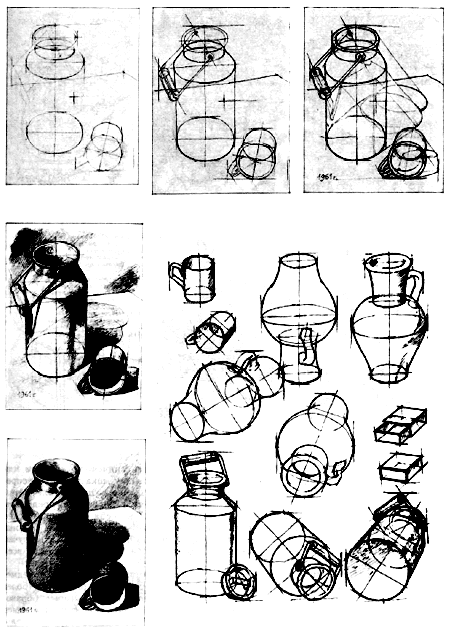
Fig 2. The sequence of the educational drawing of a still life
When drawing objects whose shape is formed by bodies of revolution, after marking the general dimensions, it is necessary to draw the main axis of rotation, symmetrically to which all forms are built. This axis must be felt and marked not only with the frontal position of the object, but also with any of its rotation relative to the point of view.
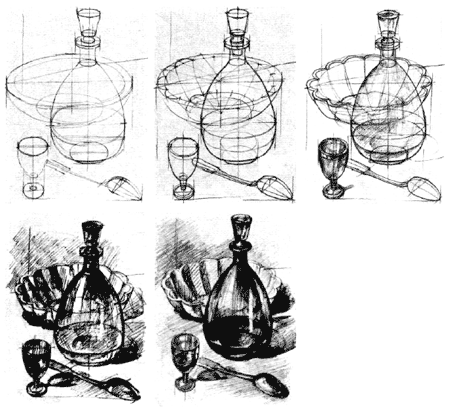
Fig 3. The sequence of the still life drawing
When drawing complex objects, formed nearby geometric shapes, it is necessary to analyze all their constituent parts and mark the characteristic points of the intersection or conjugation lines. This analysis will make it possible to more accurately determine the nature of the structure, to construct the perspective of the drawing more correctly, taking into account the spatial contraction of forms visible from this point of view, and to consciously construct elements of chiaroscuro.
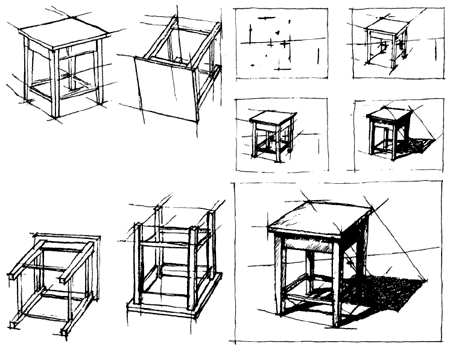
Fig 4. The sequence of the stool pattern
The shapes of many household items, such as a stool, chair, table, and the like, make it possible to see, similarly to wire models, many constituent elements at the same time. Drawing these objects is of great importance, as it makes it possible to more consciously build all the structural units visible in space, and understand their relationship with each other and with general form. First of all, you need to see this general large form, into which all structural elements fit, for example, a parallelepiped of a stool, and then mark smaller forms of individual parts in it, all the while monitoring the correct construction of the structure, proportions, perspective and connection of parts and the general.
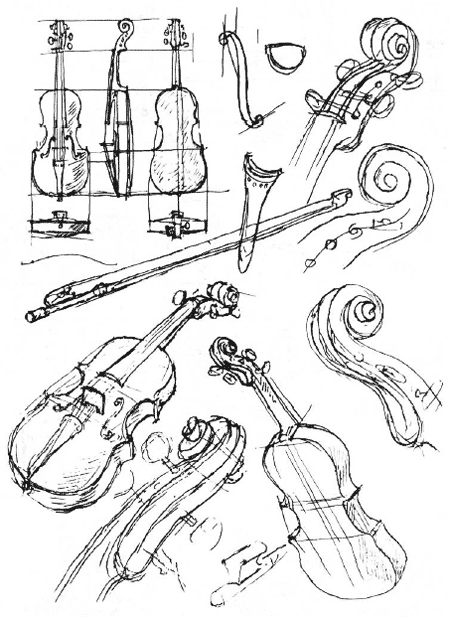
Fig 5.
The construction of chiaroscuro on these objects helps to understand and consolidate in practice the construction of shadows in space, which directly leads to an understanding of the theory of shadows in architecture. Of particular interest are musical instruments. Their complex and sophisticated form has been developed over the centuries. The form, construction and functionality of the instrument is so great that it is quite appropriate to say that it is a work of art. For example, a violin (Fig. 5). This amazing human creation is worthy not only of admiration, but also of study. Indeed, the harmony of this small, light, full of grace instrument is perfect. This applies to all musical instruments. Probably, this is achieved not only by the quality of the material and craftsmanship, but by the refinement of forms, designs and proportions, therefore, when drawing them, the slightest deviation from proportions is unacceptable. Drawing musical instruments brings up a sense of fine proportions, the beauty of lines and shapes, and, ultimately, taste. Musical instruments one must not only draw or paint like a still life, but also study them by drawing in various positions. At the same time, it is necessary to strictly follow the proportions, analyze the structures, accompanying the drawing with cuts in characteristic sections and details.
The drawing sequence is normal. It is recommended to start with basic views (positions), then move on to cuts and details, and then to drawing general view in various angles, one of which should be the “working” position in the hands of a person, characteristic of this instrument.
 Information material "young reader's corner"
 Doctor who are far to destroy
 Where to buy sulfuric acid?