Powder of modified carbon nanotubes. Electrophysical characteristics of modified carbon nanotubes
One of the most exciting, exciting activities is woodcarving. Everyone can comprehend the basics of this skill. It will take quite a bit of time to master this noble skill and start creating amazing creations. Such products are durable, beautiful and practical, respectively, they will find a place in any home.
One of the most exciting, fascinating activities is wood carving.
Before you start working with a tree, you need to stock up on all the necessary tools. After all, if the master lacks something, cutting will be problematic. Yes, and the pleasure of this creative process unlikely to be obtained.
What equipment and tools are needed:
- saw;
- brace or hand drill;
- plane;
- semicircular and flat chisels;
- a set of knives;
- small ax;
- drill.
In stores you can even see special tool kits designed for carving. They are most likely suitable for beginners, as experienced carvers are too scrupulous in choosing each individual tool.
Gallery: woodcarving (25 photos)


Wood carving lesson for beginners (video)
How to learn how to do geometric carving with your own hands: the basics
The main elements of geometric cutting are various geometric shapes.. This kind of creativity is often used to transform various household utensils and even furniture. The simplest technique, which even beginners can do, is trihedral-notched carving, due to minimum quantity tools.
- softwood;
- joint knife;
- ruler;
- pencil.

The main elements of geometric cutting are various geometric shapes.
Working process:
- Draw a pair of parallel lines with a line height of exactly a centimeter.
- Make checkerboard marks every centimeter.
- In the form of triangles, draw the teeth and mark them in the very center.
- Connect the center of the triangle to the corners.
- Deepen the toe of the cutter in the center to a depth of about five millimeters.
- Tilt the heel of the cutter alternately to all corners of the triangle.
- Tilt the cutter to the right, cut out one of the sides of the triangle.
- After that, turn the workpiece 90 degrees, cut the second side.
- Do the same with the third party.
- Cut out other triangles as well, resulting in a pattern called Single Triangles.
- Mark the central parts of the triangles at the top and connect them to the corners.
- By analogy with the previous step, cut out these details.
- Draw a line again and apply a similar pattern.
- Cut out the triangles at the top and immediately mark the lower ones, cut them out too.
Sand all uneven areas with sandpaper.
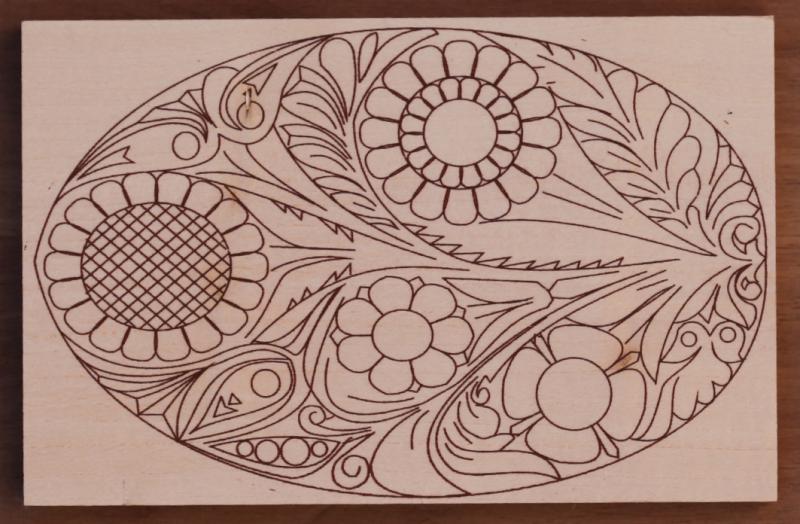
Wood carving for children
Even children can cut the simplest patterns on wood. Naturally, we are not talking about three-year-old kids, but at the age of ten, children can already try their hand at this skill. It is better to start cutting out simple elements, such as a floral ornament.
Necessary tools and materials:
- wood blank;
- pencil;
- tracing paper;
- chisel-corner;
- semicircular narrow and wide chisels.

Even children can cut the simplest patterns on wood
Cutting step by step:
- Transfer the scheme first to tracing paper, and then not to a tree.
- Trim the contour of the central circle first, then cut from the outer circle using a semicircular chisel.
- Mark the flower petals.
- With a chisel-corner, cut the petals along the contour.
- Remove excess wood between the petals using the same tool.
- With a semicircular chisel, cut out the outer contour of the petals.
- Using a large semicircular chisel, make a couple of cuts to the contour from the center of the flower.
- In order to increase the incision area, it is necessary to perform the same manipulations again.
- Round the center of the flower by unrolling the chisel.
With a chisel-corner in the center of the flower, make several cuts.
How to carve a pattern on wood
Beginners cannot immediately cut out pictures and fully master relief cutting, but making a simple pattern on a wooden board will not be a problem for them. Moreover, it does not require a lot of tools. All you need is a simple clerical knife and a few other little things.
Working process:
- You need to choose an ornament, or you can come up with it yourself.
- Attach the ornament to the cardboard and trace with the stylus.
- On the board, circle the outer contours of the stencil.
- Immediately cut out the inner ones by placing the knife at an angle.
- Cut out all other details.
- Cut through all the contours with a knife again.
- Work out all the details.
- Treat the surface, thereby creating the illusion of volume.
- Round the contours, cut off all existing sharp corners.
- Work out every detail, give it volume.

Beginners cannot immediately cut out pictures and fully master relief cutting
Treat the surface with sandpaper and varnish.
How to make a decorative plate out of wood: a master class
In order to move on to the manufacture of complex wood products, it is not enough just to read a tutorial on this skill. This requires certain skills. There is no need to be afraid of this, having done a few simple jobs you can safely proceed to the manufacture of decorative plates. Everything will surely work out.
Required materials and tools:
- lime board;
- jigsaw;
- cutters for woodworking;
- sandpaper.

In order to move on to the manufacture of complex wood products, it is not enough just to read a tutorial on this skill.
Working process:
- Smoothly, without the slightest jerks, cut the board, give it the desired shape.
- Sand the wood immediately with sandpaper.
- In the technique of geometric carving, cut out triangles.
- With a semicircular cutter, cut a recess around the perimeter of the oval.
- Gradually add depth.
- Smooth out the resulting grooves and process them with sandpaper.
- Soak the product with linseed oil or just soak it with strong tea.
Sand the dry plate with sandpaper.
Not every raw material is suitable for cutting, because the final result depends on its choice. There are both hard and soft varieties. Each variety has its own advantages and disadvantages; a special processing technology is assumed.
Among the soft rocks, the following can be distinguished:
- pine;
- aspen;
- Linden;
- juniper;
- Birch.
The advantage of soft material is ease of processing. At the same time, soft wood is much easier to spoil, just one wrong move is enough.
Hard varieties that are used in the creative process:
- boxwood;
- Red tree.
The price of hardwood is quite high. Despite this, carvers prefer to use them, as the products from them are not only beautiful, but also durable.
In addition to the hardness of the material, its color should also be taken into account. Light-colored wood may soon darken where it is cut. Therefore, when cutting large ornaments, it is recommended to use softwood raw materials.
Geometric woodcarving for beginners (video)
Many people are afraid of this kind of creativity, like woodcarving. The work seems difficult and exhausting. In fact, even a child can cope with simple tasks. After a while, any beginner can gain the necessary skills in order to make real masterpieces in the future.
Man has been engaged in the artistic processing of wood since ancient times. Carved wooden products brought him both beauty and benefit. Dwellings were decorated with ridges on the roofs, carved doors and platbands. Three examples of artistic processing of wood - dishes and souvenirs, which our ancestors traditionally did.
A huge number of palaces and temples scattered throughout Russia are decorated with wooden carvings. The ensemble built on the Kizhi of Lake Onega in 1714 serves as a classic example of a masterpiece of such architecture.
The production of turned and carved wooden utensils in Russia had a wide scope. It was customary to impregnate it with drying oil, paint it with oil and natural paints, and finish it with gold and silver. good example Khokhloma painting known to all can serve as artistic processing of wood products.
Let's look into the past
All artistic processing of wood could be carried out in the most different styles. For example, the style called baroque is characterized by dynamism in the form of mobility of forms, festive lush decor, numerous images of cupids, flower wreaths, stylized birds and animals.
Massive wood furniture looked luxurious, being decorated with mosaics, inlaid with bone or metal, as well as covered with colored lacquer or having sophisticated carvings.
In the retro style, luxurious copies of products from the era of classicism and baroque were made. And today there are also samples of unconventional solutions of designers of new forms and designs, popular among young people.
Nowadays, artistic woodworking is a creative direction of specialized work, which is taught in many educational institutions. Nowadays, interest in this topic does not dry out. As part of the school course, the boys learn the basic techniques of working with wood, allowing them to create simple products. The technology of artistic wood processing is taught as part of the profile course of art universities.
Let's talk about hand carving
In the artistic processing of wood, a special place is given to the process of hand carving. There is a great variety of the most different types. Speaking about the most common, we should first of all mention the flat thread. Further - geometric, slotted, contour.
A characteristic feature of the first variety (flat-pitched) is making depressions on a flat surface various shapes. Geometric refers to one of its modifications and is a series of square, triangular, round shape. Sample in this case can serve as a cutting board with repeating decorative details.
Contour carving is performed by cutting thin bilateral or dihedral recesses of small depth along the contour of a certain pattern. It is used mainly in the process of depicting figures of animals, birds, floral ornaments and leaves.

What is the easiest?
The simplest type of thread is slotted. It is performed with a jigsaw, which cut out the contours of a variety of shapes where you need to see something through the slots (doors, screens, cupboards, window trims). There is no background for such a wooden product. In some cases, it can be replaced with a bright fabric.
The technology for performing artistic processing of wood (woodcarving of this type) is quite simple: a pattern is transferred to a workpiece with a surface prepared in advance (polished or planed). It is also possible to use tracing paper.
Several holes are drilled along the contour of the future drawing, into which a jigsaw file is inserted and the entire contour is carefully sawn through on a special table called sawing.
How the woodworker worked
Such in the artistic processing of wood as contour, slotted and flat, have long been used to decorate Russian furniture. Openwork is a variety that has a relief pattern. As a rule, craftsmen working in the Rococo and Baroque styles decorated it with furniture.
If the products made using the slotted carving technique were nailed or glued to a wooden base, it was called an invoice.
The classification of artistic woodworking equipment has always been carried out depending on the type of work performed. How did it look like workplace wood carver? It could be the most ordinary table with a chair or a system of workbenches equipped specifically for this purpose.
The height of their covers was at the level of the master's elbows. The light fell on the left and in front. On workbenches, workpieces were fastened with screw clamps or wedges. Chisels were mainly used as cutting tools.

Tools for different types of artistic woodworking
Chisels can be straight flat, with which they protect the background when performing relief or contour carving. Grooved is useful for almost every type of work. Cranberry with a long curved neck and a short blade is used if you need to cut a recess in a hard-to-reach place. A chisel-corner is taken for cutting grooves. With the help of cerasic, narrow veins or grooves are applied.
For geometric carving, flat chisels are taken, called jambs, cutters or kosyachki. They can be short or long with a different bevel angle of the cutting edge. The most rough types of work are performed with a chisel.
Each of the tools must have a quality handle. The blades must be well sharpened with fine-tuning on the whetstone. In the case of a well-made tool, it is possible to get a high-level work.
How is the process
Wood carving begins with the markup of the selected pattern. To do this, use a ruler, square, protractor, compasses, stencils, as well as ballpoint pens or pencils. The drawing for geometric carving is a set of squares, rectangles and triangles.
Each of the recesses (recesses) is cut with a joint across the fibers, and then along them. At the same time, the joint is kept in right hand and put the toe of the blade with a slight slope on the marked line. The blade is cut into the wood and a line is made by moving towards itself.
Thus, all middle lines are performed. If a slanted cut is required, the jamb should be tilted to the left or right at an angle of 30 to 40 degrees. The marking line should not be cut. The carving process must be carried out smoothly and slowly, pressing evenly on the jamb. The tool is firmly clamped in the right hand. Sometimes you need to hold it with your left to avoid leaving in the direction of the fibers. Those who have just begun to master the process of carving are allowed to hold the tool with both hands.
The procedure for cutting trihedral recesses is reduced to processing the sides of the drawn triangles with a joint, which is held vertically in the hand. The cut goes from top to bottom. These tricks are very simple. Mastering them will not take much time and will allow you to move on to cutting out other, much more complex shapes.

On safety rules for the artistic processing of wood
1. It should be remembered that chisels are dangerous cutting tools and require careful handling.
2. Do not keep your left hand near the cutting tool.
3. Too much effort when working with a chisel is prohibited.
4. If it is necessary to strike the handle of the chisel, it should be taken in the left hand, and the mallet in the right. The tool is placed in place of cutting, then light blows are applied to its handle.
5. Chisels should be stored in specially designated places (in cabinets, workbench drawers, etc.).
Learn and learn again
Anyone who decides to achieve results in woodcarving should not rely only on his own Creative skills. A serious occupation with the artistic processing of wood includes constant training with the development of its various nuances.
There are methods that allow you to create wonderful carvings. great amount. An example of one of them is the Tatyanka style. It is based on the technology of performing floral ornament. The peculiarity of the style of carving that appeared as a result of a creative experiment is that the product is processed only once. Re-finishing is not allowed, and, in principle, it is not needed, since all elements come out from under the cutter ready, not requiring additional processing. Therefore, in this case, special tools are used.

The use of the "Tatyanka" style saves time in comparison with the execution of forms in other types of artistic wood processing related to relief carving. The tool in each case is selected taking into account the characteristics of the tree species. It is known that it can be hard or soft. Each of the devices needs to be sharpened well.
Style "Tatyanka" refers to multi-layered. Each of the layers is processed in turn, and quality assurance is important at any of the stages, otherwise the subsequent work loses all meaning. Before any detail can be reproduced, its location and design must be carefully considered. If the element is cut incorrectly, it cannot be restored.
Products made in this style are quite popular among buyers. Therefore, a master who has mastered this method will never be left without work.
Other methods of working with wood
Recall once again that each carving technique requires an appropriate tool. For example, through carving, the result of which looks voluminous, requires the use of a saw, jigsaw or chisel. Such openwork carving is widely used in decorating houses - the relief form gives additional volume.
In the technique of flat-relief carving, the background is selected and pillow.
These days it has become fashionable to create with a chainsaw. Sculptural carving is one of the most complex of all available artistic woodworking techniques. At the same time, it is very interesting. By processing the original piece of wood with the correct proportions, you can realize your plan to turn it into a figurine of an animal or a person. Volumetric details make the sculpture extraordinarily alive.

Another type of artistic woodworking is wood burning. It is also a whole layer of interesting skills and artistic techniques, requiring a separate story. By burning it is possible to obtain a rich variety of patterns of various subjects.
Before starting complex work for educational purposes, you should work on any of the simple sketches for carving, familiarize yourself with special literature, view classic diagrams and sketches with their detailed description. It does not hurt to look into GOSTs for the artistic processing of wood.
Beginner carvers should start carving small figures with minimal detail. To go to products complex shape and mastering the art of wood carving will require constant hard training.
Types of flat notching
It can be geometric, contour, nail-like or black-gloss. Each of these techniques will require its own sketches and a set of tools in the form of a knife and chisel.
The process of creating carved geometric pattern consists in cutting out squares, rhombuses, hexagons, etc., at predetermined angles. If the pattern is created using circular or triangular grooves, we are talking about the contour carving technique. If the surface is coated with black paint or varnish before starting work, the finished drawing will look extraordinarily impressive.
Master's workplace
If you decide to work in the Tatyanka technique or in any of the above, you will need a wooden plane with a flat surface. It can be a workbench, a table, a window sill or even a stool. A table or workbench is best because they are heavy and have a wooden top.

If the table is polished, it can be covered with a piece of plywood or a drawing board. This protects the tool from breakage in the event of an accidental break. Lime blanks are quite soft in themselves, it is customary to rest them against something solid.
The wood carver's workplace requires good natural light or artificial light with a wide spectrum. This is due to the painstaking nature of the work and the increased requirements for accuracy and accuracy. Ideally, a table with a lamp should be located next to the window.
A workflow training board needs constant moisture. The required humidity is about 12-15%. You can moisten the board in advance by washing its ends.
Thread material
The wood used for the carving process must have a smooth, even surface without knots and other flaws. If you deliberately take a tree with knots, then in the process of work you can beat them artistically and make a decorative composition based on them.
An excellent material for creating wooden compositions (especially in the Tatyanka style) is linden. This type of wood is easy to cut in any direction, which makes it ideal for beginner carvers. When choosing a board, pay attention to its end. According to it, you can choose a sample of dense, homogeneous and not loose wood.
It is best to choose a board sawn from the edge of the log, close to the bark. In this case, the layers are placed hollow with respect to its surface. This board is easy to cut. If it is necessary to take a break between the stages of work, it is not worth moistening the training board by wrapping it in a wet cloth or placing it in a wet bag, since the appearance and reproduction of the most different bacteria with subsequent darkening of the board and the formation of mold.
It is best to store such boards in rooms where there is no heating, for example, in sheds, hallways, bathhouses, on balconies and loggias. It is not recommended to store educational material in the bathroom, basement, refrigerator or in the sun.
Which tool is better?
There is a special tool for the "Tatyanka" style with parameters designed to work with plastic wood species. If your tool is homemade or factory, it may be of little use due to a mismatch in size and other parameters.
Working with unsuitable ones greatly complicates the process of learning to carve and reduces its effectiveness. The first simple educational ornaments are made using the most common student set, consisting of chisels No. 6 and No. 17 (semicircular medium diameter) and a joint knife. The blade of semicircular chisels in cross section looks like part of a circle. If you place such a tool end face on the board and then turn around the axis, the blade closes the circle, cutting through the wood.
An important quality of the chisel, which allows you to make deep cuts, is maneuverability. The knife-jamb is one of the main tools. The name comes from the shape of the blade with an oblique cut. Its size, as a rule, is suitable for a medium-sized hand.
The very existence of a person is inseparable from nature, which provides material for housing and clothing, food, determines the rhythm human life change of day and night, alternation of seasons. Therefore, all this is reflected in the works of folk art, which constitute an integral phenomenon of the culture of each people. A deep understanding of the material with which he works allows the folk craftsman to create many things as perfect works of arts and crafts.
Wood and clay, stone and bone, leather and fur, straw and vine- all these natural materials find organic use in different subjects life. They are processed according to their own natural properties. And this ability to use the natural qualities of the material was embodied in the creation of unique (in other areas) and in its own way unique folk masterpieces, which are one of the elements cultural and geographical image this or that territory.
Different types of folk crafts determined by that natural environment, that landscape, under the conditions and within which they were developed.
So art treatment tree could only occur in forest areas , pottery- in areas where there is an appropriate clay type. Centers for the production of art products from metal usually occur near deposits black and non-ferrous ores, such as the famous Kasli iron casting in the Urals. Production of products from stone(including from precious and semi-precious) - one of the traditional occupations of the inhabitants mountainous areas, For example Caucasus or Altai. So by making things out of amber the Balts are engaged, because this material is mainly concentrated in the area the Baltic Sea. On the coast Northern Arctic Ocean scattered in large numbers bones and fins various marine animals, such as walruses. It is not surprising that the inhabitants of the tundra (Chukchi, Koryaks, Nenets, Eskimos) make rather elegant and peculiar things from these materials. So a consequence of the development sheep breeding and breeding camels (desert and semi-desert landscapes) was carpet weaving, which in some areas, for example, Turkmenistan, moved to an industrial basis and became an important export industry. Art products from fur developed in the areas where they live taiga peoples(Yakuts, Khanty, Komi). The manufacture of leather products was developed among the peoples who settled forest-steppe, steppe, and semi-desert zones(Kalmyks, Buryats, Bashkirs, some peoples of Dagestan). Such species are almost universally developed folk art, as embroidery and patterned weaving, which perfectly reflect the originality of the corresponding area.
Elegance, artistic content of handicrafts creates an atmosphere of festivity, causes a person to be in high spirits. Products of folk craftsmen are indispensable attributes of our life, enliven everyday life people become the main "actors" in solemn occasions. Costumes in folk traditions - required attributes folklore ensembles, fairs, special exhibitions. Almost every thing created by craftsmen serves as a wonderful gift for anyone. important event in the life of an individual, family or community. And small art things - souvenirs - signs of memory of the national culture of the people and even the whole country
Russia is the most forested country in the world (45% of the territory is covered with forests, mostly coniferous (taiga)). It is not surprising that in many regions of our country the arts and crafts of artistic woodworking are developed. This fishery also exists in the western regions of Ukraine, in Belarus, Lithuania, Kazakhstan, Kyrgyzstan.
Geographic centers of woodcarving. Russia:
· The village of Bogorodskoe(Moscow region, Sergiev Posad district).
Sculpture carving.
· Specialization: wooden toy. The industry originated at the end of the 16th century.
· Linden, alder and aspen wood is used.
· Theme: villagers and various animals, especially the bear.
The most popular toy is "Blacksmiths", depicting a man and a bear,
alternately hitting the anvil. This toy has become a symbol of craft.
Cadres of masters are trained in the art school in settlement Khotkovo.
· Villages: Abramtsevo, Kudrino, Akhtyrka and pos. Khotkovo.(Sergiev Posad district).
· Flat carving. It originated at the end of the 19th century. Subject: plants and birds. Main product: box.
· City of Kirov- the main center. The craft arose at the beginning of the 19th century. Also in city of Ufn(Bashkiria)
· Specialization: art products from burl and kapokorn, (growths on trunks and roots of birch, walnut and elm. Main products: caskets, boxes, cigarette cases, watch cases.
· Veliky Ustyug(Vologda region), Semenov(Nizhny Novgorod region.), Arkhangelsk, Tomsk region and Yakutia: items made of birch bark. Main products: baskets, caskets, tuesas, boxes, vessels for storing honey and sour cream. Birch bark is harvested at the turn of spring and summer.
· Untsukul village in Dagestan(reside Avars). Canes, caskets, decorative vases, smoking pipes, cigarette cases are made from walnut, dogwood, apricot wood by the method of notching. The most common images on products are water and the sun. Khokhloma village(Nizhny Novgorod region.). Painting "Gold" on a colored background of wooden utensils. The industry originated at the end of the 17th century. Material: linden or birch wood
Primary colors: red, black, green, brown, yellow. Subject drawing: plants, birds, fish. Additional material: clay, linseed oil, aluminum powder, drying oil.
· City of Gorodets(Nizhny Novgorod region.). Painting with oil paints on a clean wood surface or a colored background. Products: children's furniture, kitchen appliances, decorative plates, wall panels. Bog oak is often used. Primary colors: black, blue, dark red, brown. Feature: shading with white paint. Plots: decorative ornament, horse, bird, human figure.
· The villages of Polkhov-Maidan and Krutets(Nizhny Novgorod region): painted toys made of wood (matryoshka dolls, whistle birds, boxes, balls that look like an apple). Subjects: plants, landscape. Feature: black contour of the drawing made with aniline paints.
· Sergiev Posad. Painting on wood with burning. It originated in the late 19th century, early 20th century. Products: caskets and boxes depicting the Trinity-Sergius Lavra and the cities of the "Golden Ring" of Russia.
· Kirov, Sergiev Posad, Semenov, Polkhov-Maidan village: matryoshka.
Differences: Sergiev Posad classic matryoshka doll is painted with gouache paints and is quite calm in coloring. Matryoshkas from Semyonov are very brightly colored. Kirov matryoshka is decorated with straw pattern. Nesting dolls from Polkhov-Maidan are distinguished by somewhat elongated proportions.
Ukraine.
Artistic wood processing is developed in the western part of Ukraine, especially in Transcarpathia, is in the Poltava region. Main product: dishes, such as salt shakers. Products in the Transcarpathian region are inlaid with mother-of-pearl, beads and metal plates. The drawing is basically a symmetrical geometric composition. Material: walnut, beech, sycamore, hornbeam and pear wood.
Belarus.
In Belarus, various types of wood processing are developed, but the products are poorly decorated. Main centers: Brest, Pinsk, and Zhlobin. Main products: chests, tables, figures of birds and horses. Features: the background is darker than the painting, often black. Many products are decorated with straw.
Lithuania.
Developed geometric wood carving. Main products: spinning wheel blades
On a picturesque hill on the banks of the Kunya River, the left tributary of Dubna, stands the village of Bogorodskoye - the birthplace of a wonderful folk craft of carved wooden toys and sculptures. Bogorodskoye is an old village.
In the middle of the 15th century, the village belonged to the Moscow boyar M. B. Pleshcheev. He bequeathed it to his eldest son Andrei. In 1491, Andrei, in turn, bequeathed to his son Fyodor. Subsequently, in 1595, the village of Bogorodskoye passed into the Trinity - Sergius Monastery. In the village stood a wooden Church of the Assumption.
Already in the XV - XVI centuries Bogorodsk peasants, at that time monastic serfs, laid the foundations for the art craft of woodworking that developed later. The village has become one of the centers of folk art in the history of Russian applied art.
In Sergiev Posad there is a legend about how in mid-eighteenth century, a resident of the town carved a doll of 9 inches (40 cm) in size from a lime churak and sold it to the merchant Erofeev, who traded at the Lavra. He put it as a decoration in the shop. The toy was immediately bought at a great profit for the merchant. After that, Erofeev ordered a whole batch of such toys. Folk craftsmen, working with a primitive tool, managed to create truthful, realistic images of the surrounding reality from wood. They carved figurines of animals and people from linden, folk life, fables and fairy tales.
Particularly interesting are toys with movement: on slats, with balance, with a button. These uncomplicated, but always witty devices make the toy lively, expressive and especially attractive.
The toy "Blacksmiths" is over 300 years old. "Blacksmiths" has become a symbol of the Bogorodsk industry. It is worth moving the slats and the brisk work immediately begins. Figures move in a clear rhythm, hammers beat on the anvil in time. And the toy "Chickens" is also a long-liver. She was played by children back in the days of Pushkin and Lermontov. In the intricate "fun" with balance lies the idea of rhythm, to which the child is naturally sensitive. It's fun to watch how strict order chickens peck at painted grains. The mechanisms themselves are simple, but the actions are effective. The sound sharpens the dynamics of the toy.
In 1923, the masters united in the artel "Bogorodsky carver" and a vocational school was opened, which trains new cadres of masters of artistic woodcarving. In 1960, on the eve of the 300th anniversary of the birth of folk craft, the artel was transformed into an artistic carving factory.
Honored Artist of the RSFSR N. Maksimov created a wonderful toy - a daring troika flies along the road, and a bear in a carved sledge. Bogorodsk toys can be found in shops, museums, exhibitions, in many houses not only in our cities, but also abroad.
Far beyond the boundaries of the Moscow region, Orthodox masters are known - miracle workers N. I. Maksimov, V. V. Yurov, S. Badaev, M. A. Pronin, A. Ya. Chushkin, A. A. Ryzhov, I. K. Stulov and other. Bogorodsk master artists - participants in numerous exhibitions; their works were awarded gold medals at world exhibitions in Paris, New York, Brussels. The Peasant and the Hen toy is in Historical Museum Moscow, the composition "How Mice Buried a Cat" - in the Museum of Folk Art, the toy "The Cavalier and the Lady", "Tsar Dodon and the Star" - in the Russian Regional Museum of Local Lore. There are toys in the Sergiev Posad Museum-Reserve.
Modern Bogorodsk carving is diverse in terms of subjects and forms of artistic expression. It organically enters the artistic culture, preserving the ancient traditions of the craft.
Bogorodskaya carving is a folk craft of carved toys and sculptures made of soft wood, existing in the village of Bogorodskoye, Moscow Region.
The village of Bogorodskoye is located near Sergiev Posad. It is known that not only peasant children, but also Russian princes played with the Bogorodsk wooden toy, and the craft itself originated in the 16th century.
Basically, the toys depicted representatives of different segments of the population: artisans, ladies and hussars, landowners and officials. Moreover, the figures were depicted in action. Later, in the 19th century, in addition to figurines, whole compositions appeared: "Troika", "Peasant Farming", "Tea Party", etc.
The material for carving was soft wood: aspen, alder, linden. Bogorodsk products are characterized by a combination of ornamental fine carving with a smooth surface. Carvers carved without preliminary sketches - stroke, hence the name "fly carving". Another feature of the Bogorodsk carving: a trihedral carving - triangular cross-section wood bars, which were obtained by splitting a log radially. The work of the master began with the harvesting of wood, which was dried under a canopy for several years. The trunk was sawn, then the logs were cut into bars of a triangular section. The craftsman made a notch with a hatchet, outlining the most general contours of the figure. After notching and rough processing of the volume, they began to work with a special short and sharp Bogorodsk knife with a beveled blade. The process didn't end there. Bogorodsk toys were almost never painted; various tools (small chisels) were used for finishing, to put the finishing touches on the toy from grooves to transfer soft skin, bird plumage, etc. The smooth parts of the sculpture were treated with emery cloth to a velvety finish. In addition to carving, toys are interesting for their moving design. Some of them were fixed on moving plates, for example, "Blacksmiths" (by the way, Auguste Rodin, who saw "Kuznetsov" at an exhibition in Paris, called them a brilliant work of folk art), others stood on a bedside table with a spring inside - "Spinner", "Dancing man" etc.
In 1923, in the village of Bogorodskoye, Zagorsky district, Moscow region, the Bogorodsky carver artel was organized, which later (in 1960) turned into the Bogorodsk art carving factory. Carving skills are mastered at the local vocational school, although there are families in Bogorodskoye who have been making toys from generation to generation.
The products of the craft - decorative sculpture and the original toy with movement - have always been popular, attracting attention with the originality and subtlety of the carving, as well as the beauty of white unpainted wood. The sculptures of the masters are created based on Russian fairy tales: "The Tale of the Golden Cockerel", "Top and Roots", "Three Heroes", etc. In addition, the masters carve figures of animals, they especially like to depict a bear: a bear-photographer, a bear-electric welder, a bear -chimney sweep, dancer bear, bear with balalaika. Used and contemporary themes, in addition, the masters perform various compositions on the themes of peasant labor and genre scenes: "Blacksmiths", "Sawyers", "Peasant on the Hunt" and others. Masters of Bogorodsk carving: F.S. Balaev, A.G. Chushkin, V.S. Zinin, I.K. Stulov, M.A. Pronin, M.F. Barinov and others.
The works of masters of the Bogorodsk trade are kept in the museums of Moscow, the Moscow region, St. Petersburg and other cities. At the World Exhibition in Brussels, the products of Bogorodsk carvers were awarded two medals - for sculpture and for a toy.
Wood has traditionally been a material that has been used for exterior and interior decoration of residential premises. And today openwork woodcarving, photos drawings and sketches which can be found in colorful art publications and on the Internet, amaze the imagination with its beauty and grace.
People who like to make decor with their own hands are able to master the art of artistic cutting. Wood allows you to create genre paintings and decorative compositions that you can decorate your own home and give to friends. Favorite skill in the hands of a connoisseur of the beauty of natural material can become the main profession. Demand for wood carvings today is higher than ever.
Tools for the job
In order to get started, you will need to pick up special tools and study the features of the technology. This business has its own nuances that allow you to more reveal the beauty of wood in the ornament.
You also need to stock up on suitable blanks and sketches that will be repeated on the tree in the form of patterns, lace, compositions or genre scenes.

For his work, the cutter uses a large set of tools:
- knives;
- jigsaws;
- needle files;
- chisels;
- electric drill;
- drill;
- bars;
- bits;
- spoon cutters;
- milling machine;
- drill.
Newbie tip :PWhen choosing tools for work, it is necessary to focus on the quality and durability of such products. In the early stages, you can get by with a small number of devices.
For a beginner, a special set of tools is intended. It is enough to master the basics of artistic processing of wooden blanks.

You will also need raw materials from certain breeds. The quality of the product will depend on this. There are hard and soft varieties of trees. Each type has its pros and cons, in each case a specific processing technology is selected.
Soft breeds include:
- Linden;
- Birch,
- aspen
- pine;
- juniper.
soft material easier to process, but it is easier to spoil it with one wrong movement of a knife or chisel. Another thing is hardwoods. These include:
- Red tree;
- boxwood.
Solid raw materials are expensive, but products from it are beautiful, durable and in demand. Experienced craftsmen work with expensive rocks, who know how to process a hard surface so as not to break the tool or get injured. Therefore, beginners should start with a cheaper and more malleable material.

When choosing raw materials, it is necessary to take into account not only the hardness, but also the color of the wood. For beginner carvers, birch will be an ideal option for creativity. It can be cut in different directions, lends itself well to drilling and cutting. When choosing a product sketch, it must be borne in mind that over time, light birch wood may darken.
Conifers are suitable for products with a large number of slots. The soft material of pine, spruce, cedar allows you to apply large drawings and create an intricate ornament. Beginners can start with conifers, as well as linden, birch and aspen.
A novice carver should learn the basics of craftsmanship from simple ornaments. For the first job, you need a small set of tools. First you can get by with a jigsaw, an awl and a knife.

Before you start cutting, you should organize your workplace with good lighting. Having picked up a suitable workpiece with a flat surface and without knots, it is necessary to transfer the selected pattern to the surface of the workpiece. To do this, you can use tracing paper. When the stencil is translated, it is varnished on top so that it does not disappear or deteriorate during work.
A beginner will need knives, chisels, an awl. For through cuts, it is better to use a jigsaw or a manual milling machine, this will save time and effort.
The carver must master all the techniques that he will then use in his work on the product. With the help of various ways of decorative processing of wood, you can create artistic masterpieces.
Artistic themes and uses
The cutter uses various sketches in his work, from which he takes an image and transfers it to the surface of the workpiece. Today, it is not necessary to use a freehand pencil image for this. Modern technological advances allow the use of photographs and scanned digital images which can be taken online.
Ornament sketch
Samples for artistic wood processing are distinguished by decorative and thematic diversity. On the Internet, on sites dedicated to this applied craft, a large selection of topics for cutting is presented. The facade of a wooden house is decorated with wooden patterns. This decor will look great on the doors and on the walls. Artistic cutting is used for the production and decoration of furniture and utensils.
Kitchen utensils and interior wooden products, decorated with intricate openwork, are very popular with buyers. In each case, the master selects the material, creates a sketch of the future product and gets to work.

Drawings are varied in their subject matter. Geometric floral motifs are used. Often the wooden surface is decorated with genre scenes depicting animals, people and trees. Wood is a very plastic material, and in the hands of an experienced carver it turns into a real artistic canvas.
For each type of artistic cutting, a special surface treatment technology is used. Using different techniques, the master creates a three-dimensional canvas on which you can notice the smallest details of the image.

Variety of tricks
For the artistic processing of wood, various technologies are used. In each case, the choice of method determines the product itself, its purpose and the type of wood from which it will be made. During the existence of this applied art form, several cuttings stood out:
- flat-relief;
- embossed;
- excavation, or geometric;
- slotted;
- contour;
- voluminous.
The pattern can be through, flat, embossed, three-dimensional, small and large. The choice of finishing directly depends on the size and functionality of the wooden product. For large items, such as decorative carvings for house facades, a large pattern is used. For interior items and for furniture, craftsmen apply small patterns to the product, which are carefully worked out.

Flat wedge pattern
Such an image is distinguished by a small relief. The image has the shape of a silhouette, and all the details are located in the same plane. For execution, an oval contour, a pillow and a matched background of the pattern can be used.
How subspecies of this technology are distinguished:
- contour,
- bracketed
- geometric (trihedral).
To perform the contour technique, in-depth lines are used that run along the main background.

Staple technology uses special notches in the form of staples to create a finish. When using geometric carving, the master draws a contour using trihedral pyramids and pegs. Repeatedly repeated in different versions, the type of cutting allows you to create a variety of relief decors that are slightly recessed into the general background. This technique is characterized by numerous compositions from geometric shapes in the form of rhombuses, triangles, honeycombs, viteyek, etc.

Openwork or through technique
When creating openwork images, the complete removal of wood from the center of the product is used. This drawing has no background. This type of thread technology is called through. It can be simple and openwork. With an openwork design, the decor is made of different heights.
Having barely learned to hold objects in his hands, the little man shows a craving for creativity. Over time, he will have the opportunity to try himself in various types of skills: needlework, modeling, origami, woodcarving, drawing. Of course, certain skills that the child received in early childhood. Sometimes a simple hobby gradually turns into a hobby, and then becomes a matter of life. So many centuries ago in Russia, one of the main types of creativity was woodcarving. And in the 21st century, it still arouses genuine interest among people.
Popular types of intricate art
 For a long time, people have decorated their homes with wooden carvings. different kind paintings, kitchen utensils, religious objects, children's toys were considered valuable things for any family. Perhaps that is why they appeared different kinds woodcarving. The most popular options are:
- geometric;
- flat notched;
- slotted;
- sculptural;
- embossed;
- openwork;
- invoice.
Fortunately, the list does not end there, because this type of creativity is widespread throughout our vast country. Let's consider just a few of them.
 Geometric wood carving involves the use of various figures in the work. These are triangles, circles, squares and polyhedra. It is used for the manufacture of furniture elements, household utensils, as well as wall crafts. ancient view such a thread is a trihedral-notched thread. This is one of the simplest methods, since it is performed with only one tool - a joint knife. For such woodcarving, you will need a simple set of items:
- lime board;
- special knife-jamb;
- ruler;
- pencil.
First, sketches of geometric shapes or a finished ornament are applied to the board. It is better for novice amateurs not to use complex drawings so that the work turns out to be flawless. For the first work, material from deciduous trees is suitable, since it is more convenient to draw straight lines on it with a sharp knife.
The wooden surface should be as smooth as possible. This is achieved by planing the board. However, it does not need to be sanded with sandpaper. Otherwise, the thread will not turn out clear and accurate, and the tool will quickly become dull.
The flat-pitted method is used to cut out recesses of various sizes and shapes on a plane. It can be oval contours and all kinds of bulges.
 The slotted type of thread is also considered quite simple. It is done with a jigsaw. A sketch of any figure applied to a wooden plane is cut out along the contour. As a result, cute crafts come out. A slotted carving is used for the manufacture of background objects through which other planes are visible. It is often called openwork carving, and it is used to decorate furniture in the Baroque style. It can also be elements of cupboards, window casings, doors, and sometimes decorative screens. If crafts are attached to a special base, then this type of thread is considered to be overhead.
The process of working with a slotted method begins with a sketch, which is applied to a pre-polished workpiece. It is transferred to the surface using a special template or transparent white paper. Then holes are made on the contours and cut out on the desktop using a thin jigsaw file.
 Relief carving includes two main methods: flat and deaf. In addition, the deaf option implies a low or convex relief. The bottom line is that the pattern is formed due to the main background of the surface.
 The flat-relief method is performed in such a way that the pattern and the background surrounding it are made at the same depth over the entire area of the base. Blind carving is characterized by a convex pattern that does not have a flat outline. Such products are valued for their high decorativeness and richness of composition. After all, a kind of miniature landscape is created on the plane with hills, depressions and depressions. To create such masterpieces, masters use elements of almost all types of woodcarving. Therefore, beginners should master each method separately in order to apply skills with more.
First steps towards mastery
 History shows that wood was traditionally used to decorate a living space. Nowadays, various photographs, drawings and sketches of wood carvings are exhibited in local history museums or print publications. This suggests that smart people who are willing to learn are able to master this art form. Wood is a wonderful natural material from which you can create decorative compositions, paintings, furniture elements and kitchen utensils. Having mastered the basics of ancient art, some have become true masters of woodcarving, devoting their whole lives to this.
Folk wisdom says: "Dashing trouble - the beginning." This is how it is if you do nothing. Practical wood carving tips for beginners open the door for brave people to the world of magnificent DIY crafts. First you need to prepare the tools and understand the basic nuances of the craft.
It is advisable for beginners to choose high-quality and durable equipment for work in order to acquire valuable craftsmanship skills.
 For wood carving, you need to prepare the following tools:
- sharp knife;
- chisel;
- jigsaw;
- bit;
- drill;
- needle files;
- spoon cutter;
- bars;
- milling machine.
Of course, for beginners, it will be enough to purchase a special set of tools for woodcarving, which includes a knife, a jigsaw and an awl. With their help, it is very convenient to master the skills of ancient craftsmanship.
The next step is the choice of raw materials. This is what the quality of the product depends on. In nature, there are two types of wood: hard and soft. The first group includes mahogany, oak and beech. To the second -, aspen, pine, spruce, birch. Of course, soft wood is easier to work with, but with one wrong move, it quickly deteriorates. Despite this, it is considered the most suitable raw material for beginners.
Hardwoods are used by professionals because they are very expensive.
In addition to the strength of the material, the color of the wood also plays a key role. A suitable raw material to learn the craft is birch. It lends itself wonderfully to cutting and drilling in any direction. When choosing drawings for woodcarving, it should be borne in mind that birch wood darkens over time. Despite this, she is very easy to work with. 
When the pattern is selected, it must be transferred to a wooden blank. In the age of technology, you can use ready-made photographs or drawings provided by specialists. The theme of the images is very different, but each has its own unique beauty. When everything is ready, you can start creating your own masterpieces. An invaluable help for beginners are thematic wood carving lessons.
Master class simple crafts
 When you look at the finished crafts, it seems that making them is not at all difficult. Therefore, many lovers of folk crafts took the tool in their hands and got down to business. To cut an ordinary flower, you need to prepare the following set of items:
- wood blank;
- double soft pencil;
- tracing paper;
- chisels.
It must be borne in mind that only special chisels for woodcarving are suitable. They should be v-shaped, narrow and semicircular. The next step is drawing. It can be taken from the Internet. To do this, a sheet of paper is applied to the screen, the diagram is redrawn, and then applied to a wooden plane. 
Start work from the central part of the sketch, carefully cutting out a circle. Then, using a v-shaped chisel, the petals are cut along the contour. Waste wood between them is removed in the course of work. If there is no such chisel, professional wood carving knives are suitable, which are no worse to wield in this craft. 
The outer part of the petal is cut out with a semicircular chisel. It becomes similar to the outline of a heart, but it's not scary. Then cuts are made in the inner part of the petal, connecting it to the center of the flower. It remains only to round it and the flower is ready. Now you can admire the first creation of your own hands. An invaluable help for beginners is a thematic woodcarving video that encourages you to immediately get to work.
Modern technology for experienced craftsmen
AT modern world many works have long been performed mechanically. Applied craft does not lag behind in this. The use of technology enables craftsmen to save their strength and precious time. Wood carving machines make it possible to quickly and efficiently prepare the source material for work. The only drawback of such devices is their high cost, but people for whom carving is not just a hobby are ready to purchase them.
Pantograph
 The device is designed to work with any wooden surfaces. It performs operations of various kinds, both volumetric and on the plane. The pantograph is used to process arcuate, bent or rotating parts. So with the help of a machine cut out various elements of furniture, statues or panels.
Drill
 Excellent device for working with hard wood. It is important to take into account the properties and location of the fibers of natural material. With the help of a drill, craftsmen sharpen tools, grind wood, and, if necessary, polish it.
Wood species with dense wood that do not tend to chip are suitable for working with a drill.
CNC milling machine
 This technique is mainly used for the production of wooden furniture with carved decoration. The machine is designed to work with plywood of any kind and wood. It is characterized by high functionality and technical capabilities. When working on such equipment, it is important to use special protective equipment - goggles and gloves. Also follow the instructions for use of the device.
 As practice shows, such machines simplify the process of wood carving. They make it possible to create a huge number of products in a short time. Devices are used not only in industry, but also for a personal workshop.
In any case, handmade products bring real satisfaction to a person. They create a pleasant atmosphere in the house, help to express the feelings of the master to his loved ones, and serve for the benefit of the household for a long time. Wooden crafts retain their natural beauty for a long time and never go out of style. Woodcarving is an art that has been passed down from generation to generation. It is available to anyone who wishes to master this craft. The main thing is not to be afraid of failures, but to be willing to learn, pick up tools and create masterpieces.
Wood carving video tutorial for beginners
 Two heads and six legs; four walk, and two lie still
 Self-esteem - what is it: concept, structure, types and levels
 Cassandra's Path, or Pasta Adventures War on Earth and Underground